How To Change Power Supply in Desktop
To change the power supply in a desktop, start by unplugging all cables connected to the computer and gently removing the old power supply from the case. Then, locate the new power supply and install it by connecting the cables to the motherboard.
Finally, plug the cables back into the computer and ensure everything is securely connected before turning it on. Keep in mind that if there is limited space, you may need to remove other components. It’s always a good idea to consult the computer’s manual or contact the manufacturer for guidance. Upgrading your power supply can also help with upgrading other parts, such as the graphics card.
Gather The Necessary Tools And Materials
- A new power supply unit (PSU)
- A screwdriver
- Anti-static wrist strap
- Cable ties or zip ties
- Thermal compound (optional)
How To Change Power Supply (PSU)
Unplug And Open Your Computer
When it comes to changing the power supply in your desktop, the first step is to safely turn off your computer and unplug all the cables connected to it. This includes disconnecting the power switch if your power supply unit (PSU) has one.
Once everything is unplugged, you can open the computer tower or case to access the internal components. Gently remove the old power supply from the case, making sure to unscrew and remove the side panel of your tower.
Locate the power supply and carefully disconnect the cables from the motherboard. If there is little room in your PC, you may need to remove other components to access the power supply. Before you install the new power supply, it’s important to make sure you are grounded to prevent any static electricity damage.
Once grounded, install the new power supply by connecting the cables to the motherboard and any other necessary components. In conclusion, changing the power supply in your desktop involves unplugging and opening your computer, safely disconnecting the old power supply, removing it from the case, and installing the new power supply. Make sure to follow proper grounding procedures and consult the manufacturer’s instructions for your specific desktop model.
Disconnect The Old Power Supply
To replace the power supply in your desktop, you must first disconnect the old power supply. Identify the PSU and locate all the cables attached to it. Disconnect all cables from the old PSU with care.
After that, remove the old power supply from the case. It should be an easy task, although if there is not much space in your PC, other components may need to be removed to access the power supply.
Before beginning to work inside your PC case, make sure that you are grounded to avoid static electricity damage. Unscrew and remove the side panel of the tower to locate the power supply. If you are unsure of the power supply’s location in your desktop, you can consult the manual or contact the manufacturer for help.
Knowing the power supply of your PC is also beneficial when upgrading other components, such as your graphics card. Don’t forget to turn off your system completely and unplug it from the wall before starting the power supply replacement process.
Remove The Old Power Supply
Remove the old power supply:
- Start by unplugging from the wall all of the cables connected to your computer.
- Gently remove the old power supply from the case. This is usually a simple process, but if there is little room in your PC, it may be necessary to remove other components first.
- Unscrew and remove the side panel of your tower and locate the power supply.
- Before you start messing around inside your PC case, make sure you are grounded to avoid static electricity damage to your components.
Install the new power supply:
- Gather the necessary tools and materials.
- Disconnect the cables from the motherboard.
- Remove the old power supply and replace it with the new one.
Connect power supply cables:
- Refer to the manual or the manufacturer’s instructions to properly connect the power supply cables to the motherboard, storage devices, and other components.
By following these steps, you can safely change the power supply in your desktop computer.
Install The New Power Supply
- Gather the necessary tools and materials.
- Unplug all the cables from your computer and open the case.
- Disconnect the old power supply from the motherboard.
- Remove the old power supply unit from the case.
- Place the new power supply unit in the vacant spot inside the computer case.
- Securely screw the new PSU in place to ensure it doesn’t move.
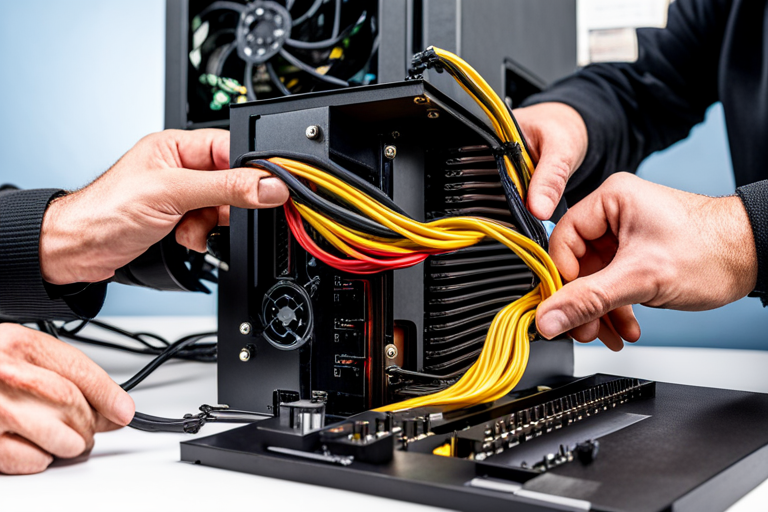
- Connect the cables to the motherboard and other components, ensuring they are properly seated.
- Close the computer case and plug all the cables back in.
- Start your computer and check if the new power supply is functioning correctly.
Connect The Cables To The New Power Supply
To replace the power supply in your desktop, start by unplugging all the cables connected to your computer and then carefully remove the existing power supply from the case. Make sure you are properly grounded before working inside your PC case.
Gather the necessary tools and materials you’ll need to install the new power supply unit (PSU). After that, disconnect the cables from the motherboard and remove the old power supply. Connect all the cables that were previously disconnected from the old PSU to the corresponding connectors on the new power supply unit, and ensure that all connections are secure.
Once the new power supply has been installed, you can verify its functioning by removing the side panel of the case. If you want to upgrade components of your computer, it’s important to know the power supply of your PC. Additionally, be sure to switch off the power strip or the PSU on the backside of your PC when the computer is not in use to conserve energy.
Close The Computer Case And Plug In The Cables
For a successful power supply change in your desktop PC, make sure to take the necessary precautions. Begin by unplugging all cables from the wall socket and detach the old PSU from the case, taking into account any size limitations.
Take off the tower’s side panel and locate the power supply. Grounding yourself is an essential step to protect from static electricity. Securely fix the PC case, plug in all previously disconnected cables, and check that the wattage of the new power supply is compatible with your system. If you have a pre-made PC, the power supply details are in the computer manual or can be obtained from the manufacturer.
Knowing the power supply specs can also be beneficial when upgrading other components, such as the graphics card. Lastly, it is best to turn off your system completely when idle. Shut off the power strip or switch off the PSU from the back, as some components still use power when the PC is powered down. By following these steps, you can safely and effectively change the power supply in your desktop.
Test The New Power Supply
Here are the steps to test the new power supply in your desktop:
- Begin by turning on your computer and checking if the new power supply is functioning properly. Look out for any abnormal sounds or error messages during startup.
- Make sure to unplug all cables connected to your computer from the wall. This will ensure your safety while working with the power supply unit (PSU).
- Gently remove the old power supply from the case. If there is limited space in your PC, you may need to remove other components to access it.
- Unscrew and remove the side panel of your tower to locate the power supply.
- Disconnect all cables from the motherboard that are connected to the old power supply.
- Carefully remove the old power supply from your computer.
- Install the new power supply by connecting the cables to the motherboard.
- Secure the new power supply in place, ensuring it is properly aligned and screwed in.
- Once everything is properly connected and secured, turn on your computer and check if it functions without any issues.
- If you encounter any problems or unusual behavior, double-check all connections and consult the manufacturer’s manual for troubleshooting steps.
Remember to always exercise caution when working with electronics and consult professional help if needed.
Additional Tips And Considerations
When changing the power supply in your desktop computer, there are additional tips and considerations to keep in mind. First, ensure that the new unit has adequate wattage for your computer’s components. This will ensure proper functioning and prevent damage. It’s also important to ground yourself before working on your computer to prevent static electricity from damaging sensitive components.
Refer to the computer manufacturer’s manual or contact their support for specific instructions on power supply replacement. Gather the necessary tools and materials before starting the process. Begin by unplugging all cables connected to your computer.
Open the computer case and disconnect the old power supply. Remove the old power supply by gently taking it out of the case. Install the new power supply by connecting the necessary cables and securing it in place. Finally, close the computer case and test the functionality of the new power supply.
Frequently Asked Questions Of How To Change Power Supply In Desktop
Can I Change The Power Supply On My Computer?
Yes, you can change the power supply on your computer by following these steps:
- Unplug all cables connected to your computer.
- Gently remove the old power supply from the case.
- Unscrew and remove the side panel of your tower to locate the power supply.
- Disconnect the cables from the motherboard.
- Remove the old power supply and install the new one.
- Make sure you are grounded before working inside your PC case.
- Reconnect all cables and close the tower. By replacing the power supply, you can upgrade other parts of your computer, like the graphics card.
How Do I Find The Power Supply On My Desktop?
To find the power supply on your desktop, remove the side panel of the case. If you have a prebuilt PC, consult the manual or contact the manufacturer for information. Knowing your power supply can help with upgrading components like the graphics card.
How Do I Manage My Pc Power Supply?
To manage your PC power supply, follow these steps:
- Unplug all cables connected to your computer.
- Gently remove the old power supply from the case.
- Install the new power supply.
- Connect the cables to the motherboard.
- Turn off your system completely when not in use to save power. Remember to turn off the power strip or switch off the PSU on the back side to prevent power consumption.
How Do I Know If I Need To Change The Power Supply In My Desktop?
To determine if you need to change the power supply in your desktop, check for signs like frequent system crashes, random reboots, or sudden shutdowns. If you notice these issues, it’s likely that your power supply is faulty and needs to be replaced.
Conclusion: In this blog post, we discussed the step-by-step process of changing the power supply in a desktop computer. We emphasized the importance of unplugging all cables and properly removing the old power supply before installing the new one.
It is crucial to be cautious and follow safety measures throughout the process. Changing the power supply is relatively easy, but it may require removing other components if space is limited.
By following the provided guidelines and taking necessary precautions, anyone can successfully replace their power supply and ensure smooth functioning of their desktop computer.